
Going paperless, might sound daunting, but it’s not as bad as you might think. It’s easily within your grasp, and you can even do it for free. I’ve been paperless for years, and have found some tactics that really work. I’ve had friends try this approach successfully too, so I wanted to share it with you in case you’re interested. Two quick clarifications:
1) I didn’t get paid for this. Nothing shady here. I have not had contact with any of the apps or products I discuss below. These are my own opinions and experiences.
2) There are MANY ways to go paperless. This is just one approach that’s worked for me.
Productivity Gladiator is about solutions you can act on right now, so here’s one if you want to give it a try! To get started, it’s free, so no excuses!
Why Paperless?
For me, I’ve moved a lot! 27 times in my life. Each time I moved, I had to pack up all the papers, folders, and file cabinets. I used to HATE packing up the desk area. They were always the heaviest boxes! Why was I dragging all this around? Why did I need all these paper copies, particularly in our digital world? One afternoon in 2013, I started watching YouTube videos on people’s approaches to going paperless. One of the videos described a guy’s approach that used Evernote, and I was immediately struck by how simple it seemed. I decided to try it. As I started my journey, I found it worked for me. I kept going, and by doing one or two folders per day, within a year I was paper-free. Moving addresses after that was much simpler. I’ve never looked back or felt more unburdened.
Also for me, I’m very aware of my time’s value, and with this digital approach, it’s faster and easier than ever for me to find any record I’m looking for. It’s saved me hundreds of hours and headaches over the years tracking down files and information, even while I’m on the go, and I hope you find all of these benefits as you start on your journey.

Before the “how”, a quick tip about the “what” you should be keeping.
Going paperless will be a much longer and more involved process if you’re the type of person who just keeps everything. This sound familiar? If you haven’t heard of, or read Marie Kondo’s book, the Life Changing Magic of Tidying Up, I recommend it. She mentions going through your things and “Keep only those things that speak to the heart, and discard items that no longer spark joy. Thank them for their service – then let them go.” This is great advice with the paper documents you have to. In addition, I would also ask “Have I used any of these papers in the last 2 years?” and “Will getting rid of this paper cost me money in the future if I don’t have it?”. If it passes those checks, consider getting rid of it. Keep what you need, and set yourself free from the weight of all that extra paper you’ve been carrying around all these years.
What’s the benefit to going paperless?
Here’s a few:
You can access your documents anytime, even from your phone.
Find a document in seconds by searching for keywords, instead of flipping through folders
You can quickly share documents or even whole sets of files with someone if they need a copy.
Never again have someone ask you for something while you’re out somewhere and have to say “oh I don’t have that with me, I’m gonna have to send that to you later when I get home.”
So much physical space! No more file drawers and file cabinets.
Okay, how can you go paperless for free?

EVERNOTE
This is the software to keep and organize it all. Evernote saves all kinds of documents, images, thoughts, etc. not just your papers. I’ve had friends who scanned their old photo albums into Evernote as well! For this discussion, I’ll focus on how great it is organizing your paper files. The free “tier” account does everything you need to get started. Go create an account. I recommend using an email and password to log in, since there are other apps and services like Scannable below, that connect to your Evernote. When you’re connecting accounts to each other you must use your name and password, the google sign-in doesn’t always work.

Scannable by Evernote (for APPLE)
Download Scannable on your smartphone. At the moment, Scannable is only available on the Apple App Store. Hold your device’s camera over each page one at a time and it will automatically sense the document and take a picture as a PDF. It only takes a second or two per page so it works pretty quickly. You can save multiple pages as one file. It can save as an image file or a PDF, so on the screen, select the option for “PDF”, hit “Save”, and select “Evernote”. Done! You can also use this app to email the PDFs which has come in handy for more than just being paperless. Great app.
Scanning For Android
For android users, Evernote now scans pages from within the Evernote App itself on android. You can read about it here and give it a try.
Organizing In Evernote
Each file is saved as an attachment to a “Note” in Evernote. You’ll give your Note a Title, generally a few words on what the document is. Notes can then be organized with “Notebooks” and “Tags” to further organize. To explain, let’s compare it to your old file system at home. The Note is the document. The Notebook is the physical folder you filed the document in. Each Note can only be placed in one Notebook. Tags, however, can be applied to any note, and you can add as many tags as you like to a note. It’s another way to organize and view your notes. You can view your notes by Tag, Notebook, and/or search notes by keyword.
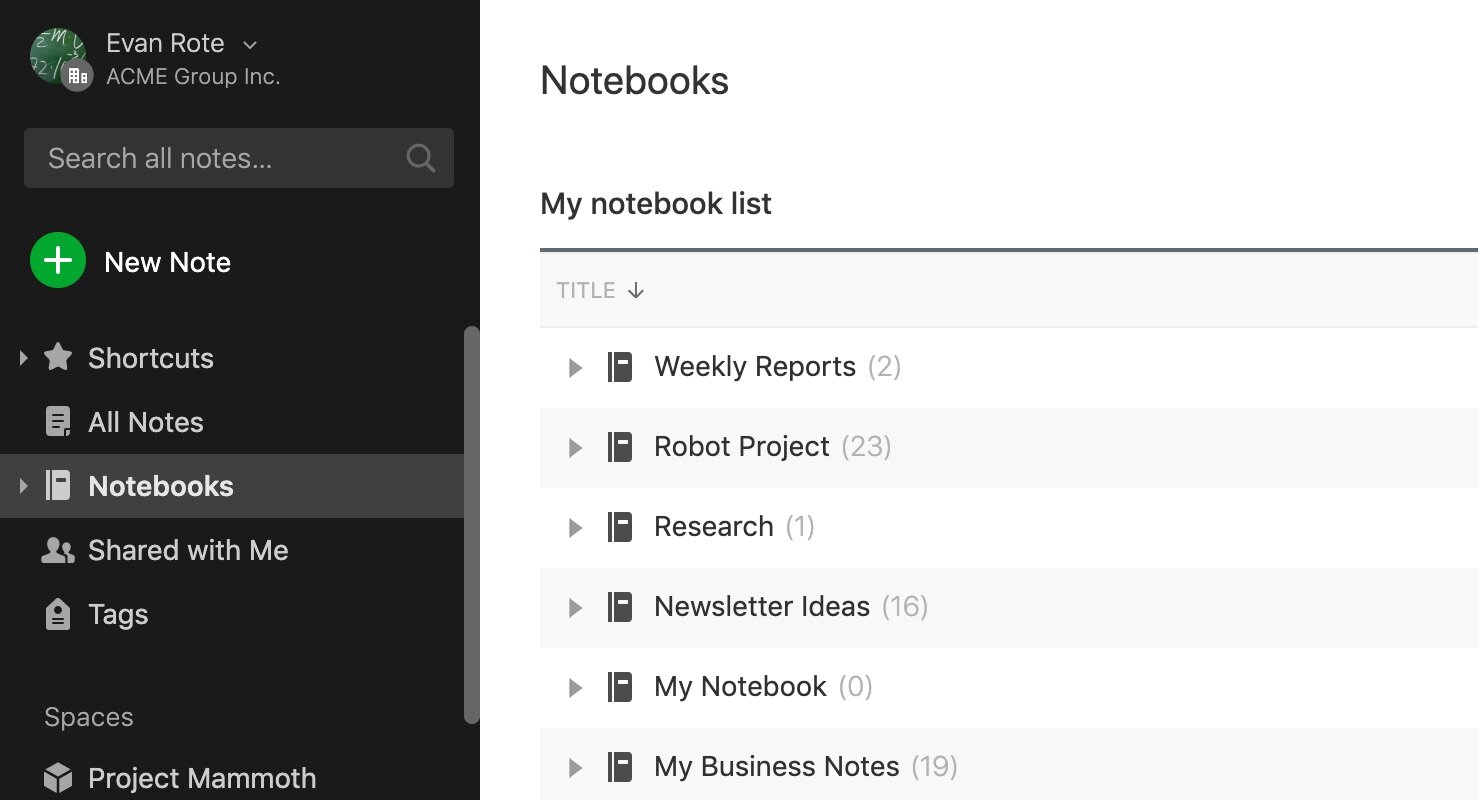
Let’s take an example, let’s say you’re scanning a file of papers you have for “Tax Returns” that has multiple years worth of returns in it. You could create a general Notebook in Evernote called “Financials”. You’ll title each document for what part of the tax return it is, and you could place each Note (document) in that “Financials” Notebook. You can then add Tags to each document for the year it refers to such as “2021 Taxes” or “2022 Taxes”.
Another example, you might have a Notebook for “college”, then a Tag for each semester (“Spring 2021, Fall 2022) and another Tag for the major/degree it pertains to such as “Business”, “Undergrad”, and/or “Law School”. This way you can easily drill down to the documents you’re looking for by semester or major/degree. You can also put a Tag for the calendar year, such as “2022” and view all the Notes in that Tag, which will show you all the documents across all of your Notebooks.
Evernote is flexible to how you organize and process, which is why it has worked for so many people.
There are a few limits on the free account, such as number of devices that can access your account and the number of MegaBytes (MB) you can create/upload per month. At my last check it was 60MB per month you can upload, which I’ve heard from people trying this equates to about 150 documents (some with multiple pages) you can upload per month. While this may be frustrating, I actually see this as a good thing for two reasons: 1) Going paperless won’t happen in one afternoon, and it will force you to pace yourself. 2) It will really consider whether you NEED to keep and scan each document, because limits aren’t a bad thing (remember Marie Kondo above!) You can see the breakdown of what’s included in the free and pay plans here.
Tips from my experience:
You can use as many tags as you like, but applying Tags does take time because you have to apply them to each note. I’ve found over time that keeping it simple and only placing the Note in a Notebook and using 1 or maybe 2 Tags.
The search feature in Evernote can search Tags, Notebooks, and the Titles you give each of the Notes. You’ll likely find that you search for documents more often than just browsing through Notebooks and Tags.
Create an “!Inbox” Notebook and make it your default Notebook which you can send all new Notes into when you scan your documents and create new notes. I put the “!” in front so it will always show up at the top of the alphabetic list of notebooks. Don’t keep any notes in “!Inbox”. Just hold the new notes you create there until you have the chance to (for me it’s monthly) go through and rename/Tag the Notes and move them into the right Notebooks. You’ll know you’re up to date once that the “!Inbox” Notebook is cleared out.
For security, I recommend whiting out your Social Security Number and any other confidential information you’re concerned about when scanning, that way it’s not out there on the “Cloud”. I don’t have a reason to doubt the security of Evernote, but I also think that step is a “better safe than sorry” step, kind of like locking your front door.
For a further look into Notebooks vs Tags here is a great article.
Shred the paper once you’ve scanned it in, and recycle it all! Then enjoy not having to lug around all of that extra weight in your life.
That’s it! Its simple, go give it a try!
Level-Ups - How do you take it to another level?
Beyond the above, I’ve taken a few extra steps in my journey that I’ve found useful, even though they aren’t “free”. Sharing those too in case they’re helpful.

Evernote “Personal”
I pay for Evernote “Personal”. `With this tier plan, there’s 2 main advantages I get:
The upload limit is higher each month, so I COULD upload more each month. Once I scanned everything in though, I don’t need to upload much each month
I get Optical Character Recognition (OCR) on my uploads. This means Evernote reads and recognizes the text in the PDF’s I upload. This way when I search in Evernote, not only does it search the notebooks, tags, and titles I give the notes, it also finds the search term inside all the PDF documents as well. For instance, if I scanned a receipt for the towels I bought at Walmart, I might have put it in my “Receipts” Notebook in Evernote and named the note “Walmart”, but not added any text to the note title about “towels”, that was just printed on the receipt I scanned. Using Evernote Personal with the OCR ability I can search with the keywords “towel” and OCR will find that receipt for me with my search.
Fujitsu ScanSnap Scanners

If you’re like me, you still get paper through the mail and from various places, and while I can use my phone to scan, I was looking for a way to easily and quickly scan documents into Evernote. I’ve personally found these scanners to be good to use for this, and the reviews online were positive when I got mine as well. They’re quick and efficient, and you can set up the software to automatically create a Note in Evernote with your scanned PDF, just load your document in the scanner and press the button. My scanner has survived monthly scanning of all of my mail and receipts for years now. The automatic Note creation in Evernote is what keeps me coming back.
That’s it! There have been a few pieces of paper I keep, such as car insurance/registration. Unless there’s a legal reason that I need to keep that piece of paper though, I throw away and scan every piece of paper from my life each month! Sending you all the positive vibes for your journey to a paperless life too!

I’m Brian. At age 4, I was diagnosed with insulin dependent (type 1) diabetes and told that I was going to have a harder life that was likely 10-20 years shorter than normal. I’ve lived my best life every day since then, because you only get one chance to live it. I created Productivity Gladiator because I saw what a difference it made to share small and specific actions you can take right now, right away, to achieve better work life balance, be more productive, better manager your time, and live your best life right now not wait until retirement. I want you to start doing the things you WANT to do, not get stuck chasing what you NEED to do. If any of this resonates with you, send me a note. It brings me joy to share this passion with you.